|
Looking Back:
Our Research: https://docs.google.com/document/d/1K9ZQCtNMK0ajdC1cBRHPE6e7LyHyVJ-rlOT7x3XUGXE/edit?usp=sharing Annika, Sammie and I first did a lot of research on the different parts of a rocket. We each researched separate parts and it was hard to find specific information on model rocket parts and the purpose behind them. I mainly found the purposes for real rockets or information that used very technical terms. We also didn't realize that each of us needed to know all the different aspects of a rocket and what they do so when we first told Andrew we were ready we were very unprepared. We went back and looked at each other's information and learned everything we needed to know. We decided to use the Payloader II because it had a little space to put something in. We initially wanted to put in a little lego guy but we alter decided we wanted to put a camera to film how the rocket travelled. We put everything except the camera and the engine together and our rocket was ready. Looking Beyond: Rocket engines have a fuel and an oxidiser, together they are called the propellant. When you launch the rocket, the propellant reacts inside the combustion chamber and it creates hot gases. The ejection of these hot gases and high speeds are what creates the thrust and moves it up. There weren't that many questions that had come up so far since we only built the rocket according to instructions. A few that came to mind were how different the rockets will fly if we changes the shape of the fins, the diameter or the shape of the body and how you could build one from scratch. I did do more research behind rockets and found the chemistry behind the engine and the purpose behind the fins and the shape of the body (aerodynamics). Looking inward: I thought I performed well but there were points, like when building the fins and marking the body of the rocket that weren't exact and kind of janky. The fins were hard to glue together since it came in two different parts and it was difficult to mark straight lines on the body because it was a cylinder. The fins turned out good and they stuck on well to the body thanks to the fin holder thing but about a week later, when we looked at the fins from the bottom we realized they weren't perfectly symmetrical. All these variables will probably affect the flight of the rocket but I'm sure it'll work. Looking outward: I worked with Sammie and Annika. I think our group performed well, we got distracted at times but we got the rocket done pretty quickly and I thought we did well. We worked together to build the rocket and it was very collaborative. I helped reading and interpreting the instructions to build the rocket. The instructions were confusing but we split the work equally and we were able to follow along. I'm not sure how it will work when we launch though. Looking Forward: If I could do this again, I would probably be more careful with the fins and take more time with them. When we glued them to the body we aligned it with the preset position the holder thing was in instead of following the lines exactly as we marked. Besides that I think it went well. To continue this experiment I could maybe build a rocket from scratch or make the engine but I don't think I would want to. It was a cool experience but I think building the model rocket was enough. Take aways: So far, I learned how to work with other people to create one product, I wasn't sure how we would all work on one thing, but there were a lot of different parts we split up. I also learned a lot about rockets and the physics and chemistry that goes on behind it. 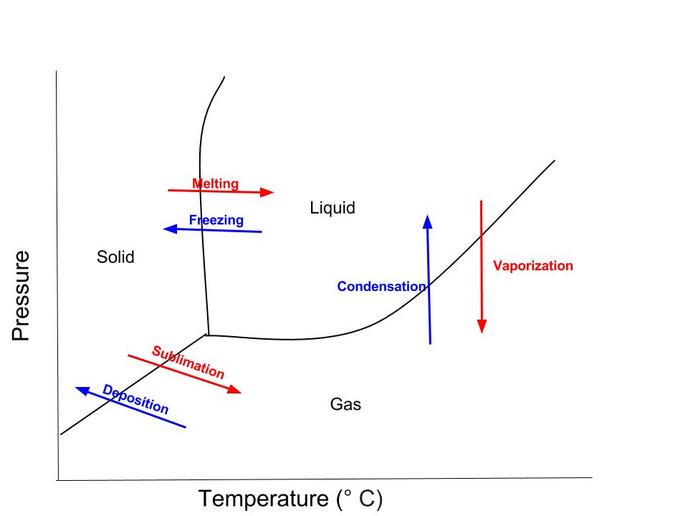 1. Describe the three phases of matter in terms of shape and volume.
Solid matter has molecules that are packed together with no room to move, solids have a definite shape and volume. Liquids have molecules with some room to move, taking the shape of it's container while the volume remains the same. Gaseous matter have molecules so far apart that it has no set shape or volume but a gas can be compressed. 2. Draw a phase change diagram, and label all components. 3. What are the names and types of phases changes between the various phases? There is freezing, melting, condensation, vaporization, sublimation and deposition. Liquids can freeze to become a solid or evaporate to become a gas. Solids melt to become a liquid, and sublimation occurs when it becomes a gas. Gases condense to become a liquid and deposition happens when gases become solid. 4. Explain how snow forms by deposition. When the atmospheric temperature is at or below 0 degrees celsius and there is some moisture in the air. The snow will reach the ground if the ground is below freezing. When water vapor, or the gaseous state of water, from the cloud is cold (the atmospheric temperature) it turns into solid ice crystals. 5. Describe how liquid carbon dioxide can be achieved. You can get liquid carbon dioxide if you increase the pressure of solid carbon dioxide. You increase the pressure to 5.1 atmospheres and keep the temperature below -20.5 degrees celsius. You put the carbon dioxide into a high pressure sealed container. The sublimation process increases the pressure forcing the carbon dioxide into a liquid form. 6. Describe what temperature and pressure combinations typically contribute to a solid, liquid, or gas being formed. As the temperature rises, the faster the particles move. If it's a liquid, once it reaches high temperatures it becomes a gas. With low temperatures, it slows the particles down making a solid. Pressure only slightly reduces the space between closely packed molecules. Liquid often can't be compressed with pressure but the more pressure the more solid it becomes. High pressure and low temperatures often result in a solid, high temperatures and low pressure makes gas and midway between it becomes liquid. 7. Describe how to separate a mixture of two liquids. There are two different types of liquids, immiscible and miscible. There are different separation techniques for these liquids and their different properties. Immiscible liquids (like oil and water) are easy to separate. You let the two liquids separate into two layers and let one liquid out. Miscible liquids however, dissolve into each other. I found a lot of different ways but fractional distillation is often used. Fraction distillation is possible with liquids of different boiling points. By boiling the mixture at different points it makes the different liquids evaporate. Or a centrifuge is used as well. It spins mixtures very quickly forcing the liquids with different densities to separate. Looking Back:
We started out researching bismuth, how it works, what safety precautions we need to take, how to make it the color we want and so on. It was helpful because we were working with Natalie who was there when Andrew was doing the first bismuth experiment. She knew a lot about the whole process and how it worked. Once we did our research and checked with Andrew, we started our experiment. We used the leftover bismuth from the group before us and we started to heat it up. It took some time because the bismuth was stuck to the sides of the little measuring cup we used and the hot plate heated up the bottom. There was a time when someone came over and started jamming the metal stick into the solid bismuth around the edges to get it to move down. Which was very dangerous with the melted bismuth in the center. We were lucky it didn't splash up and we shouldn't have let that happen. When it finally melted down, we put the smaller cup of bismuth in to the big one. After that we took it off the hot plate to let it cool. We scraped off the slag that came to the top so it wouldn't get on the crystals (which we later found we didn't do enough of). We poured out the liquid and flipped the cup over to get the color we wanted, which was blue. We hit the cup against the table and got the bismuth out. Looking Beyond: The bismuth makes steps in the crystal because there's a higher growth rate on the outer edge then the inside causing a hollowed out "hopper" like crystal. It gets its color by a thin oxide layer on its surface. That's why you can determine the color of your crystals by how much oxygen you expose it to. The slag is the not pure stuff from the block of bismuth. I'm still unsure of why the bismuth acts that way compared to other metals, so there were a lot of questions that came a long with this experiment. I had questions like why does bismuth do this, how do the crystals form, and most of the science behind it. I tried to research and look more deeply into this but only found the information above. Looking inward: We were successful with making the bismuth crystals and getting the color we wanted. However, I think we left some slag when we poured the liquid out since it got on our crystals and put a slightly yellow layer over the blue crystals. I think we got this result because we weren't completely sure what the slag was and how to remove all of it. We could've looked more into it to be more successful. Besides that, I think we were successful because we had Natalie in our group who knew a lot about the whole process and we also did a lot of research on the steps. We were very careful and slow in the whole process. In this activity, I think I performed well in the sense I didn't endanger myself or anyone around me. I wore safety glasses and was careful when around the bismuth and hot plate. Looking outward: I worked with Natalie, Sammie and Annika in this experiment. I think our group performed well but Natalie did a lot of the work. I think it could've been more of a collaborative experiment but it was still fun. I think I could've contributed more and helped Natalie out so it didn't feel like she was doing it alone. I did take pictures of the whole experiment and sent it to the members of my group. We were safe the whole time wearing safety glasses and gloves when handling the bismuth and we followed the steps carefully. Looking Forward: If I did this again, I think I would get more of the slag off and be more involved. We are doing this experiment again to get more pieces so I will keep that in mind to have a more successful outcome. I think I would work with the same people since we work well together.To continue this we could try to get different colors and sizes of bismuth. Not related to chemistry we could also make jewelry out of it. It's be cool to continue this and to produce more crystals. Take aways: I learned how to handle more dangerous experiments, with the hotplate, melted metal and so on. I also learned about bismuth and how to make crystals/ how they form. |
AuthorWrite something about yourself. No need to be fancy, just an overview. Archives
October 2015
Categories |
 RSS Feed
